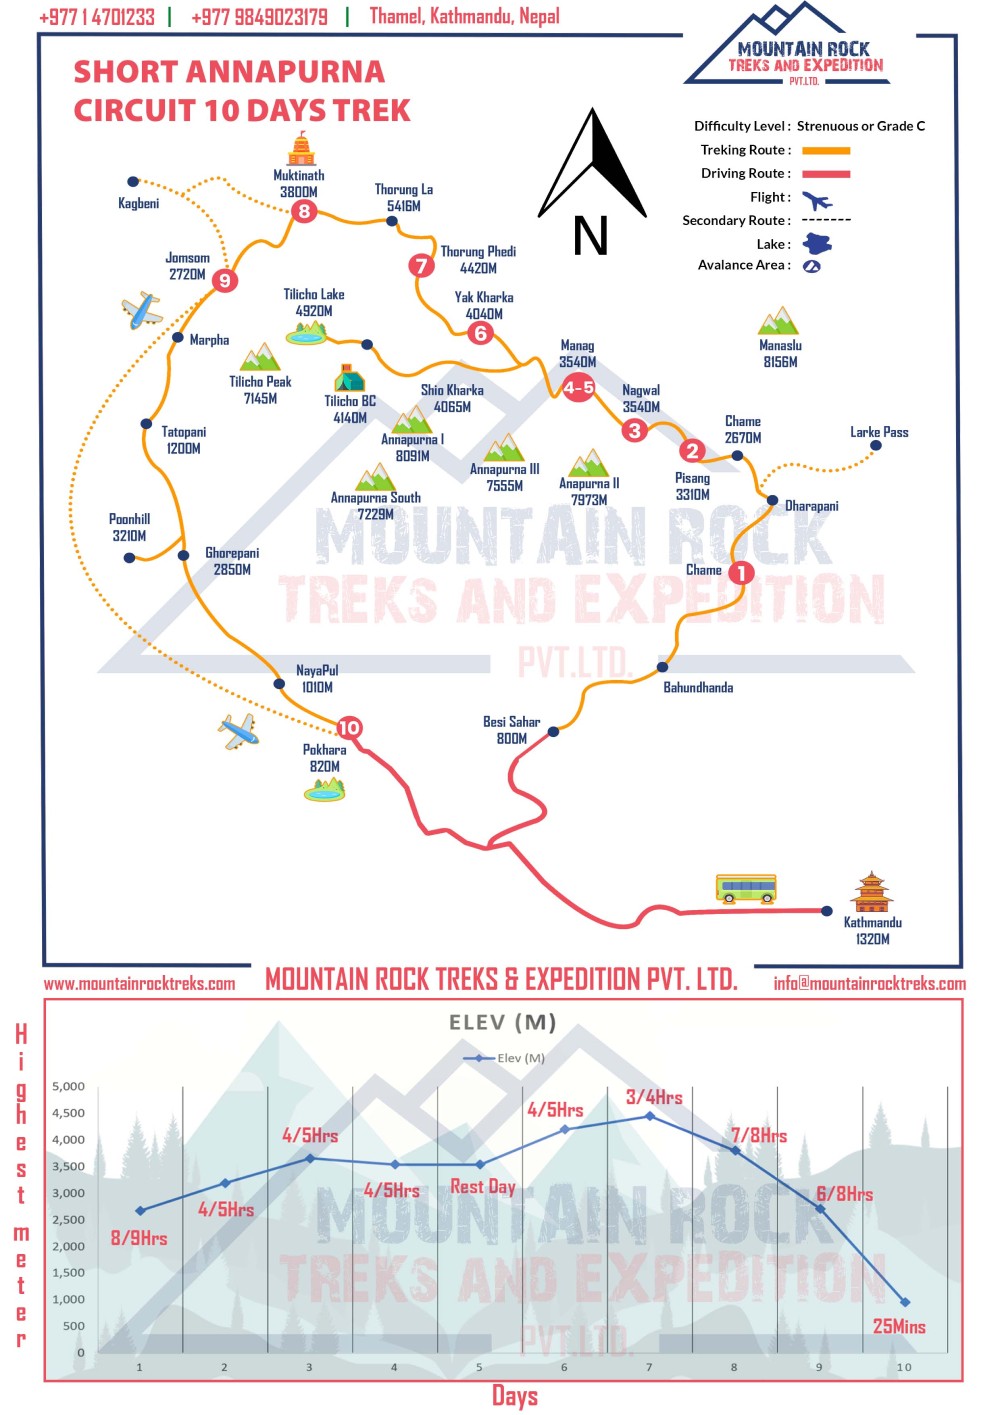
The short Annapurna Circuit serves as a great opportunity to explore the famous Annapurna massif in just 10 days. You’ll drive through the lower Marsyangdi Valley and reach Manang, go across the Thorong La Pass (5,416 m), and finally arrive at Jomsom. The trek is considered Strenuous or Grade C, which means it is suitable for those who are fit to deal with high-altitude trekking.
A trekking map makes it easy to find out what the trekking route looks like. It shows where you drive and where you trek. It lists the names of villages, marks every elevation point, draws the surrounding peaks, and makes a statistic about your altitude while sleeping. Thus, we take a look at the map part by part: colors, lines, icons, numbers, village names, mountains, lakes, side tracks and the elevation chart. After that, we describe the whole itinerary day by day.
Short Annapurna Circuit Trek Snapshot
Detail
Information
Trek name
Short Annapurna Circuit 10 Days Trek
Difficulty level
Strenuous or Grade C
Trek length
10 days, Kathmandu to Pokhara
Start point
Kathmandu (1,320 m)
First road stop
Besisahar (800 m)
Trekking starts near
Dharapani
Highest point
Thorong La Pass (5,416 m)
Trek ends
Jomsom (2,720 m)
Journey ends
Pokhara (820 m)
Rest day
Day 5 in Manang (3,540 m)
Route shape
A loop around the Annapurna range
Short Annapurna Circuit Trek Itineraries
Day
Itinerary
Time
Altitude
01
Drive from Kathmandu to Besisahar (800m) and drive to Dharapani
8-10 hours drive
1950 meters
02
Trek Dharapani to Chame(2670 m)
4-5 hours
2600 meters
03
Trek to Pisang (3300 m) - 5 to 6 hours
5-6 hours
3210 meters
04
Trek from Pisang to Manang (3,540m) - 4 to 5 hours
4-5 hours
3500 meters
05
Explore & Acclimatization Day in Manang.
6-7 hours
3500 meters
06
Trek Manang to Yak Kharka/Letdar (4040m)
5-6 Hours
4040 meters
07
Trek Ledar to Thorang Phedi (4420m) - 3 to 4 hours, or Thorang High Camp (5416m) - 2 to 2.5 hours
5-6 Hours
5416 meters
08
Trek Thorang Phedi via Thorang La Pass (5416m) to Muktinath (3800m) - 7 to 8 hours
7-8 hours
3800 meters
09
Trek Muktinath to Jomsom (2720m) via Kagbeni (2800m) via Jhong -6 to 8 hours
6-8 hours
2800 meters
10
Drive from Jomsom to Pokhara (820m) -8-10 hours, then your destination
How to Read the Short Annapurna Circuit Route Map?
Mountain Rock Treks Short Annapurna Circuit Trekking 10 Days Map and Altitude Chart
There is a distinct style to every excellent trekking map. This one employs a limited palette of colors, line styles, and icons. The moment the meaning of each color is identified, the rest of the route becomes apparent instantaneously. We begin with the overall representation of the route and then go to its detailed description.
The Big Picture: Layout and Direction
At a glance, the trekking map depicts the trekking route as a large circle. So, Kathmandu is situated at the lower right position on the map, shown with the symbol of a temple, its elevation being 1,320 m. It starts off westwards and then contours north around the edge lands of the Annapurna. After that, the route comes back south and runs along the Kali Gandaki River valley towards Pokhara that is seen at the lower left point of the map, with its elevation being 820 m.
At the top of the map, there is a large compass rose marked with the letter N, indicating that the north of the map is the top. The direction matters because the trek appears to run counterclockwise to how it is shown on the map: you begin from the east, move north, and finish in the southwest.
Written above the map in bold red letters is the title Short Annapurna Circuit 10 Days Trek. In the upper right corner of the map, there is a legend explaining the lines and signs used on the map. Right below the map, an elevation chart describing the height of every day of the trek can be found. All three parts of the map (the path map, the legend, and the elevation chart) tell the full story of the trek together.
The Legend, Row by Row
The legend sits in the upper right of the map. It has six entries, and each one plays a clear role.
Legend entry
Symbol on the map
What it refers to
Difficulty Level
Text: Strenuous or Grade C
The overall challenge of the trek
Trekking Route
Orange line
The trail you walk on foot
Driving Route
Red line
The road sections you cover by vehicle
Flight
Blue airplane icon
The flight option between Jomsom and Pokhara
Secondary Route
Dashed line
Optional or alternate trails and connections
Lake
Blue lake icon
Lakes along and near the route
Avalanche Area
Blue hazard icon
Zones where avalanche risk exists
Let us look at each entry closely.
Difficulty Level: Strenuous or Grade C
The very first section states that the difficulty level is Hard or Grade C; this is the highest of the common trekking grades used for teahouse trekking in Nepal. This means that the trek does not require ropes or climbing, but the days are long, the altitude is high, and crossing the pass on the eighth day puts a strain on the human body. This type of examination tells you at the outset what kind of trek you are going on; thus, you have to get mentally prepared before starting the hike.
Trekking Route: The Orange Line
The orange line is the central feature on the map; every segment you walk is colored orange. It commences not far from Dharapani and goes upstream along the Marsyangdi River through Chame and Pisang to Manang, climbs Yak Kharka, and ultimately reaches Thorung Phedi. After that, it crosses Thorung La and goes down to Muktinath. The last portion of its way is directed along the Kali Gandaki Valley up to Kagbeni and Jomsom.
The map shows that the orange line continues past Jomsom. Traveling along this orange stripe, it will go through places such as Marpha, Tatopani, Ghorepani, and Nayapul before arriving at Pokhara. This indicates that one could continue on foot along the valley path to the destination instead of opting for a flight or a car journey. Furthermore, a section of the orange line branches out from Manang to get to Tilicho Lake to the northwest, while there is also a short stretch reaching Poonhill.
Driving Route: The Red Line
The red line indicates the sections traveled by means of a vehicle. This line goes along the highway from Kathmandu to Besisiahar and Pokhara. There is even a small bus icon on this red line that reminds you of a road day on the first day of the route. Finally, the red line is also shown in the lower-left corner of the map, ending at Pokhara. The red line indicates the length of the trek, which is a ten-day trek. The vehicle takes over the long, low, and busy part of the trek. Your legs are saved for the high, scenic, and dramatic parts of the trek. On the map, the red and orange lines intersect at a point where the road ends and the trail begins in the lower Marsyangdi Valley.
Flight: The Blue Airplane Icons
The blue airplane icons are found on the map only on the western side of the map. One icon is slightly to the left of Jomsom, while the other icon is around Pokhara. The two icons tell us that there is a flight option between Jomsom and Pokhara. A dotted line connects the two icons gracefully, and this marks the flight path of the flight from Jomsom to Pokhara, which lasts for about 25 minutes.
In the elevation chart, you will notice that Day 10 has the labeling of "25 Mins." This label refers to the flight. Alternatively, there is an option of an 8- to 10-hour drive.
Secondary Route: The Dashed Line
According to the legend, secondary routes are marked as dashed black lines. On the map, they appear as dotted lines diverging from the principal line depicted in orange. Secondary routes provide alternative paths, and they are not part of the main itinerary. Secondary routes are found in the following locations:
Dharapani to Larke Pass: this section shows a dotted trail coming from Dharapani and leading towards the Manaslu area.
Kagbeni to Muktinath and Jomsom: this section shows the dotted line circling Kagbeni on the top left portion of the map.
Jomsom to Pokhara: the dotted line that is shown in the earlier section of this study.
Secondary routes add flexibility to the map and help create such a strong base as the main circuit, while the rest of the trails diverge from the main route.
Lake: The Blue Lake Symbol
The lake symbol can be found in two locations. The first location is next to Tilicho Lake (4,920 m) in the north. The second place is next to Pokhara (820 m) in the south. The symbol near Tilicho helps indicate that this lake is one of the highest on a trekking trail in Nepal, and it highlights the fact that the lake is not far from the main trail that the trekkers are following, which is at Tilicho Base Camp (4,140m). The symbol next to Pokhara indicates the end of the trip in the town, which is located at the lake.
Avalanche Area: The Danger Symbol
The last item on the legend suggests avalanche zones. It infers that the region of the high mountains is dangerous and that, depending on the weather conditions, specific areas can be dangerous. This is especially the case for the area close to Thorung La since avalanches do occur due to snow accumulation.
The Red Numbered Circles: Your Day Markers
You'll see round shapes in red with text in white along the orange line. They show the days of the itinerary. This goes from 1 to 10, indicating which days of the itinerary correspond to the days.
Circle
Where it sits on the map
1
Beside the lower Marsyangdi Valley label near Dharapani and Chame
2
Between Chame and Pisang
3
Beside Nagwal
4-5
Manang (a shared circle for two days)
6
Yak Kharka
7
Thorung Phedi
8
Muktinath
9
Jomsom
10
Pokhara
The 4-5 circle is strange in that it contains 2 figures. It indicates that you stayed in Manang for 2 nights, and that Day 5 is your rest day. This joint symbol is one of the cleverest features on the whole map, as it immediately displays your rest day.
The circles 1-3 are at the bottom of the valley, but they are quite close together, so often their exact placement can look close together. Your written itinerary is always the final authority as to where you sleep each night.
The Dark Blue Dots: Villages and Waypoints
Towns, locations, and various signposts are indicated as small dark blue spots on the paths. Every dot is named and usually equipped with an altitude sign. The spots reveal places where the paths run through the populated areas. Among such towns are Besisahar, Bahundhanda, Dharapani, Chame, Pisang, Nagwal, Manang, Yak Kharka, Thorung Phedi, Muktinath, Kagbeni, Jomsom, Marpha, and Tatopani, Ghorepani, Poonhill, Nayapul, and Pokhara. Tilicho Base Camp, Shio Kharka, and Larke Pass also have such signs.
The Green Mountain Icons: Peaks Around the Route
The green mountain icons indicate the famous peaks that shape the landscape along the trekking path. The symbols show the name and the height of the mountains and are depicted on the route where each peak can be admired.
Peak
Height on the map
Where it sits on the map
Manaslu
8,156 m
Upper right, east of Manang
Annapurna I
8,091 m
Center, south of Manang
Annapurna II
7,973 m
Center right, above Pisang
Annapurna III
7,555 m
Center
Annapurna South
7,229 m
Center left
Tilicho Peak
7,145 m
Upper left, near Tilicho Base Camp
The Manaslu peak, standing at the height of 8,155 meters, is the eighth tallest peak in the world, while Annapurna, standing at 8,091 meters, is the tenth highest in the world. Both are giants standing above the height of eight thousand meters, and both share a listing on a unique trekking map.
The Other Icons: Temples, Tent and Bus
The map has small icons that represent different locations.
Temple Icon at Kathmandu: the red-orange pagoda identifies the capital of Nepal, situated at 1,320 meters above sea level.
Temple icon at Muktinath: the sacred temple town is situated at a height of 3,800 meters known to be sacred to both faiths, Hinduism and Buddhism.
Tent icon at Tilicho Base Camp: the icon identifies the camping site situated at a height of 4,140 meters on the route to Tilicho Lake.
The bus icon shows the colorful vehicle that depicts the journey, which starts on Day 1, taking you overland with the help of road transport.
The Background Watermark and Header Details
The map shows a faint outline of a mountain shape and a company logo at the center of the map, behind the route. This is considered a watermark and is not related in any way to the route, hence, you can ignore and continue tracing your route on the map. The phone numbers, email, and website mentioned in the headers and footers are contact information and, hence, not related to the route information.
Reading the Elevation Chart Under the Map
The chart at the bottom of the map is called ELEV (M). It also gives you a different perspective of the adventure shown in the top map: it shows you how high you are climbing, as well as how long walking takes place on those given days.
The Axes and Labels
The vertical axis shows the Highest meter range, which runs from 0 to 5000 meters in increments of 500. The horizontal axis has a label of Days and ranges from 1 to 10. The blue colored line with small diamond markers represents the height of that day. The red labels explain how many hours of walking or travel there were on that day.
What the Line Shows Day by Day
Day
Time label on chart
Approximate altitude on chart
What it shows
1
8/9 Hrs
About 2,700 m
A long travel day by road
2
4/5 Hrs
About 3,200 m
The first trekking day
3
4/5 Hrs
About 3,650 m
A steady climb toward Manang country
4
4/5 Hrs
About 3,540 m
Arrival in Manang
5
Rest Day
About 3,540 m
The line stays flat
6
4/5 Hrs
About 4,200 m
A climb to Yak Kharka
7
3/4 Hrs
About 4,450 m
The highest sleeping point
8
7/8 Hrs
About 3,800 m
The pass crossing and the descent
9
6/8 Hrs
About 2,700 m
A long descent to Jomsom
10
25 Mins
About 900 m
The flight to Pokhara
The altitudes correspond to the values given on the chart line. Actual altitudes can be seen on the main map.
How to Understand the Shape
At first sight, the line illustrates the story of the trek. It climbs for the first three days, so your body is slowly acclimating to a higher altitude. On Day 5, it flattens, which is a day for resting and acclimatization. After that, it climbs for two more days, reaching its maximum height, then descends steeply for three days in a row.
The chart represents the altitude at which you reach the end of each day, not the maximum you achieved during the whole day. Therefore, Day 8 shows about 3800 m (Muktinath) and not 5416 m. The point on Thorong La at 5416 m is shown in the main map, while in the chart you can see the day’s more useful altitude where you are supposed to sleep for that night. This corresponds with the principle of traveling high and sleeping low in good high-altitude treks.
Every Place on the Map, in Route Order
The table shows the name of each location mentioned on the map in the sequence it occurs; if there is no measurement of the altitude on the map, it is mentioned.
Place
Altitude on the map
Role on the route
Kathmandu
1,320 m
Start of the journey
Besisahar
800 m
First stop on the drive
Bahundhanda
Not labeled
Ridge village near Besisahar
Dharapani
Not labeled
Where trekking begins
Chame
2,670 m
District center of Manang
Pisang
3,310 m
Village below Annapurna II
Nagwal
3,540 m
Upper trail village
Manang
3,540 m
Acclimatization base
Yak Kharka
4,040 m
High pasture settlement
Thorung Phedi
4,420 m
Base of the pass
Thorung La
5,416 m
Highest point
Muktinath
3,800 m
Sacred temple town
Kagbeni
Not labeled
Gateway village of Mustang
Jomsom
2,720 m
End of the main trek
Marpha
Not labeled
Village on the southern route
Tatopani
1,200 m
Southern route waypoint
Ghorepani
2,850 m
Southern route waypoint
Poonhill
3,210 m
Southern viewpoint
Nayapul
1,010 m
Road link to Pokhara
Pokhara
820 m
End of the journey
Apart from the main trail, Tilicho Base Camp (4,140 m), Shio Kharka (4,065 m), Tilicho Lake (4,920 m) and Larke Pass are mentioned separately.
The Route in Five Sections
Using the map in parts allows us to represent the entire trip more clearly.
Section 1: The eastern approach. The red line leads you from Kathmandu to Besisahar and beyond along the lower Marsyangdi Valley until you reach Dharapani. This part is done by car and refers to Day 1 of the trip.
Section 2: The upper Marsyangdi has the orange line, which runs from Dharapani through Chame and Pisang to Manang. There's a gradual ascent in altitude, and when it comes to nature, there are forest areas, rock walls, and open settings. This part of the journey includes Days 2-4.
Section 3: The high basin starts at Manang, taking you through Yak Kharka to Thorung Phedi. This is the high, dry, open area part of the trip covering Days 5-7.
Section 4: The next part crosses Thorung La to Muktinath and continues following the Kali Gandaki River from there to Jomsom. This stage takes Days 8 and 9.
Section 5: Finally, the journey southward consists of flying, driving, and walking to Pokhara on Day 10.
Short Annapurna Circuit Itinerary at a Glance
Day
Route
Altitude
Time
1
Drive Kathmandu to Besisahar, then to Dharapani
Besisahar 800 m
5 to 6 hrs, then 3 to 4 hrs
2
Trek Dharapani to Chame
2,670 m
4 to 5 hrs
3
Trek to Pisang
3,300 m
4 to 5 hrs
4
Trek Pisang to Manang
3,540 m
4 to 5 hrs
5
Explore and acclimatize in Manang
3,540 m
Rest day
6
Trek Manang to Yak Kharka or Letdar
4,040 m
4 to 5 hrs
7
Trek to Thorong Phedi or Thorong High Camp
4,420 m
3 to 4 hrs, or 4 to 5 hrs
8
Thorong Phedi over Thorong La to Muktinath
5,416 m, then 3,800 m
7 to 8 hrs
9
Trek Muktinath to Jomsom via Kagbeni and Jhong
2,720 m
6 to 8 hrs
10
Drive Jomsom to Pokhara
820 m
8 to 10 hrs
Day-by-Day Short Annapurna Circuit 10 Days Itinerary
Day 1: Drive Kathmandu to Besisahar (800 m) and Dharapani
Max Altitude: 1,860 m (6,102 ft)
Altitude Gain: 540 m (from Kathmandu, 1,320 m)
Duration: 5 to 6 hrs drive to Besisahar + 3 to 4 hrs drive to Dharapani
Distance: Approx. 225 to 235 kilometers
Meals: Breakfast, Lunch, & Dinner
Accommodation: Teahouse
Mode of Transportation: Private or shared jeep
Our trip starts in Kathmandu, where we begin at a height of 1,320 m. The departure is in the early hours of the day to skip the hectic city traffic. The motorable path goes through the lush green terraced hills and tiny market towns along with deep river gorges. We will be traveling along the Trisuli River and the Marsyandi River during our journey, making the view greener hour by hour. It will take us until noon to reach Besisahar at a height of 800 m, which is traditionally the starting point of the trek and also the lowest point in the trek.
Following the meal, we resume traveling by jeep, going deeper into the Marsyangdi Valley. The route moves on to Bahundhanda, a village that stands on a ridge and gives broad vistas over fields of rice; then the road proceeds north along the riverside of the valley. In the course of this journey, we come across a number of suspension bridges and many waterfalls, some of which pour directly onto the road, and this is the point where quite narrow passages, with vertiginous cliffs rising on both sides, become visible. The character of the environment is changed from tropical to temperate and the temperature of air decreases in the course of time. When evening arrives, we arrive at Dharapani.
On the map: The red road line, the icon of a bus, the icon of a temple, the location of Beshishar, Bahundhanda, and Dharapani on the map, and the dotted road that represents the secondary road from Dharapani on the way to Larke Pass. The elevation map calls this route "8/9 Hrs".
About Dharapani
Main Highlights: Marsyangdi River, the trail junction toward Larke Pass, and the first mountain views of the Manang district
Accommodation: Local teahouses, usually with twin-sharing rooms
Meals: Dal bhat, noodles, fried rice, soups, pasta, and other teahouse meals
Wi-Fi: Sometimes available for an additional fee
Mobile Network: Available but can be patchy
Electricity: Available; charging may cost extra
Hot Shower: Usually available for an extra charge
ATM: Not available, so carry enough cash
Difficulty: Easy (a driving day)
Altitude Risk: Low
Day 2: Trek Dharapani to Chame (2,670 m)
Max Altitude: 2,670 m (8,760 ft)
Altitude Gain: 810 m
Duration: 4 to 5 hrs trekking
Distance: Approx. 14 to 16 kilometers
Meals: Breakfast, Lunch, & Dinner
Accommodation: Teahouse
Mode of Transportation: Trek
On our first day of trekking, we follow the orange line along the banks of the Marsyangdi River. After leaving Dharapani, we hike through pine, oak, and rhododendron forests. The trekking path crosses many suspension bridges and leads gently through small settlements such as Danaque and Timang. The waterfall flows down the slopes of the valley while the river loudly flows far below the hiking path. When the hike goes up the valley, it opens up, and a couple of the first large mountains can be seen ahead. Manaslu (8,156 m), as seen in top right corner of the map, and Annapurna II above the ridges.
Chame, Manang's district headquarters, is the first village that begins to really feel Himalayan. There's a handful of shops, a bakery, a tiny market and natural hot springs across the river from where we settle in that afternoon, allowing for an easy exploration of the village and an acclimatization to the thinner mountain air. (The elevation chart indicates this day as "4/5 Hrs," and the blue line commences its gradual ascent.)
On the map: the orange trekking route, the dot for Chame 2,670 m, the Manaslu mountain icon, and the red circle just off the lower Chame label.
About Chame
Main Highlights: Marsyangdi River, natural hot springs, Buddhist mani walls, and views of Manaslu and Annapurna II
Accommodation: Local teahouses, usually with twin-sharing rooms
Meals: Dal bhat, noodles, fried rice, soups, pasta, and bakery items
Wi-Fi: Often available for an additional fee
Mobile Network: Available but can be patchy
Electricity: Available; charging may cost extra
Hot Shower: Usually available for an extra charge
ATM: Not reliably available, so carry enough cash
Difficulty: Easy to moderate
Altitude Risk: Low to moderate
Day 3: Trek Chame to Pisang (3,300 m)
Max Altitude: 3,300 m (10,827 ft)
Altitude Gain: 630 m
Duration: 4 to 5 hrs trekking
Distance: Approx. 14 to 16 kilometers
Meals: Breakfast, Lunch, & Dinner
Accommodation: Teahouse
Mode of Transportation: Trek
Walking on this delightful trail in the narrowing valley today, the trail traces the riverbank. A series of suspension bridges takes us higher and higher as time passes. The air becomes colder and thinner, while the mountains look more impressive. A few hours later, we reach the big Paungda Danda, which is a massive convex rock wall rising straight up from the valley. It looks like a huge piece of light stone and signifies the moment when the dramatic changes in the landscape start to take place. According to the map, Annapurna II (7,973 m) is located in the southeastern part, right over Pisang.
We reach the village of Pisang by early afternoon. The village is known for its strong Tibetan Buddhist influence, with prayer wheels, mani walls, colorful flags, and a small monastery. Pisang is located at an altitude of 3,310 meters above sea level. The village actually has two parts – one on the lower part of the hillside and one on the upper part with a better view over the valley and the snow peaks.
In terms of elevation, this day is marked as "4/5 Hrs" in the itinerary, where this segment is marked with rising lines.
On the map: a dot shows Pisang at 3,310 m, Annapurna II is marked, and a red circle denotes the spot between Chame and Pisang.
About Pisang
Main Highlights: Upper and Lower Pisang, Annapurna II views, Tibetan Buddhist monastery, and Paungda Danda rock wall
Accommodation: Local teahouses, usually with twin-sharing rooms
Meals: Dal bhat, noodles, fried rice, soups, pasta, and other teahouse meals
Wi-Fi: Sometimes available for an additional fee
Mobile Network: Available but can be patchy
Electricity: Available; charging may cost extra
Hot Shower: Usually available for an extra charge
ATM: Not available, so carry enough cash
Difficulty: Moderate
Altitude Risk: Moderate
Day 4: Trek Pisang to Manang (3,540 m)
Max Altitude: 3,540 m (11,614 ft)
Altitude Gain: 240 m
Duration: 4 to 5 hrs trekking
Distance: Approx. 15 to 18 kilometers
Meals: Breakfast, Lunch, & Dinner
Accommodation: Teahouse
Mode of Transportation: Trek
From Pisang, there are two trails that head towards Manang, and on your map you see both of these routes marked with places along the trails. The trail on the upper side passes through Nagwal, which on your map is marked at 3,540 m. This trail is higher up, quieter, and offers more distant views of Annapurna III (7,555 m), Gangapurna and the surrounding peaks around Manang. The trail below goes along the valley floor through Humde and the area around the airstrip. This trail is shorter and flatter. Both trails end up in the same village.
We arrive in Manang by early afternoon, and it is the centre of the circuit with its mix of stone houses, ancient monasteries, cafes, little shops and amazing views. Your map shows the Annapurna range rising to the south and the beginning of the spur trail option towards Tilicho Lake to the west. You will find that days 4 and 5 are indicated on your map with one red circle, '4-5', as you spend two nights in Manang. On the elevation profile, day 4 is marked '4/5 Hrs' with the blue line showing the altitude as approximately 3,540 m.
Your map should show the following: the dots for Nagwal and Manang both at 3,540 m, the shared '4-5' circle, and the icon for Annapurna III.
About Manang
Main Highlights: Gangapurna Lake, Braga Monastery, Himalayan Rescue Association altitude talks, and views of Annapurna II, III and Gangapurna
Accommodation: Local teahouses and lodges, some with attached bathrooms
Meals: Dal bhat, noodles, fried rice, soups, pasta, pizza, and bakery items
Wi-Fi: Often available for an additional fee
Mobile Network: Available but can be patchy
Electricity: Available; charging may cost extra
Hot Shower: Usually available for an extra charge
ATM: Not reliably available, so carry enough cash
Difficulty: Moderate
Altitude Risk: Moderate to high
Day 5: Acclimatization and Exploration Day in Manang
Max Altitude: 3,540 m (11,614 ft) sleeping altitude; the optional hike reaches about 3,900 m
Altitude Gain: 0 m at the lodge; 300 to 400 m during the acclimatization hike
Duration: 3 to 4 hrs of light hiking and exploring
Distance: Approx. 4 to 6 kilometers
Meals: Breakfast, Lunch, & Dinner
Accommodation: Teahouse
Mode of Transportation: Trek (short hikes)
On Day 5, rest is the order of the day. As can be seen in the chart that displays a straight blue line, this day is referred to as "Rest Day." Although we are in Manang, we do not sit quietly; we begin the day with a moderate hike where we ascend a couple hundred meters above. This is how the climb high, sleep low philosophy comes into play. From the viewpoint, we can take in the sights surrounding us and return to the place of sleep at a lower level. The sights include Gangapurna, a glacier lake below it, and Annapurna III.
The afternoon is for taking it easy. You could spend the day sightseeing on the trails around the village, or enjoy a more leisurely exploration of the area's ancient monasteries. The map includes the mountainous region around Manang, including the peaks of Annapurna II (7,973 m) and Annapurna III (7,555 m) that rise to the east, the even higher Annapurna I (8,091 m) to the southeast, while Annapurna South (7,229 m) rises to the west of the village, with Tilicho Peak (7,145 m) to the northwest. This is also the day when extra time permits a side excursion to Tilicho Lake (4,920 m) via a trail that goes through Shio Kharka (4,065 m) before reaching Tilicho Base Camp (4,140 m) (indicated with a tent icon) and then on to the lake.
On the map: the "Rest Day" label on the chart, the Annapurna peaks, Tilicho Peak, Shio Kharka, Tilicho Base Camp with the tent icon, and the Tilicho Lake icon.
About Manang (Acclimatization Day)
Main Highlights: Gangapurna Lake viewpoint, Braga Monastery, local cafés, and the Tilicho Lake trail junction
Accommodation: Same teahouse as the previous night
Meals: Dal bhat, noodles, fried rice, soups, pasta, and bakery items
Wi-Fi: Often available for an additional fee
Mobile Network: Available but can be patchy
Electricity: Available; charging may cost extra
Hot Shower: Usually available for an extra charge
ATM: Not reliably available, so carry enough cash
Difficulty: Easy
Altitude Risk: Moderate to high
Day 6: Trek Manang to Yak Kharka or Letdar (4,040 m)
Max Altitude: 4,040 m (13,255 ft)
Altitude Gain: 500 m
Duration: 4 to 5 hrs trekking
Distance: Approx. 9 to 10 kilometers
Meals: Breakfast, Lunch, & Dinner
Accommodation: Teahouse
Mode of Transportation: Trek
We set off from Manang following the orange line up the Jarsang Khola valley, where we soon leave the trees behind. Shrubs, rocky patches, and wide alpine valleys open up before us. We pass small hamlets and pastures, where yaks and horses can be seen wandering past the hills. It is a fairly easy climb, although the air begins to thin out with every passing hour, giving the illusion that the mountains are coming towards you.
Yak Kharka, which means “yak pasture,” is a small village, comprising a couple of lodges. Letdar is also nearby, and it is possible to stay over at either village. According to the map, Yak Kharka (destination 6) has an altitude of 4,040 m, with a trekking time of 4/5 hrs. The blue line on the map climbs up past 4,000 m for the first time. As with everywhere else in Manang, the nights are long, and things take a strangely wild turn.
On the map: circle 6, Yak Kharka at 4,040 m, and the orange line going up towards Thorong La.
About Yak Kharka
Main Highlights: Alpine meadows, grazing yaks, Jarsang Khola valley, and close views of Annapurna and Gangapurna
Accommodation: Basic local teahouses, usually with twin-sharing rooms
Meals: Dal bhat, noodles, soups, and simple teahouse meals
Wi-Fi: Rarely available, and slow when it is
Mobile Network: Limited and patchy
Electricity: Limited; charging usually costs extra
Hot Shower: Sometimes available for an extra charge
ATM: Not available, so carry enough cash
Difficulty: Moderate
Altitude Risk: High
Day 7: Trek Letdar to Thorong Phedi (4,420 m) or Thorong High Camp
Max Altitude: 4,420 m (14,501 ft) at Thorong Phedi; about 4,900 m (16,076 ft) at High Camp
Altitude Gain: 380 m to Phedi; about 860 m to High Camp
Duration: 3 to 4 hrs trekking to Phedi, or 4 to 5 hrs to High Camp
Distance: Approx. 6 to 8 kilometers
Meals: Breakfast, Lunch, & Dinner
Accommodation: Teahouse
Mode of Transportation: Trek
It's a short day, as the chart rightly shows with the 3/4 Hrs label. We crossed a suspension bridge, trekked up a valley and along a ridge to get to Thorong Phedi. The map marks this place with the number 7, and the altitude here is 4,420 m. It's a barren landscape, typical of higher altitudes. Slopes are steep and rocky with little or no trees. The mountains close in on all sides, with the pass still out of sight.
You have two options for where to spend the night. Thorong Phedi is the usual place to stay, and it's where the map shows you. Thorong High Camp is a bit more upmarket (at roughly 4,900 m) and will shorten your walking time on the morrow. But please be aware that the pass itself is at 5,416 m, so High Camp is actually lower than the pass! The highest altitude on our sleeping chart for the day is roughly 4,450 m, which is about the altitude of the Phedi.
On the map: circle 7 (Thorung Phedi) at 4,420 m, and the Thorung La just beyond that at 5,416 m.
About Thorong Phedi
Main Highlights: Base camp of Thorong La, steep mountain walls, and the starting point for the pass crossing
Accommodation: Basic teahouses with twin-sharing or dormitory-style rooms
Meals: Dal bhat, noodles, soups, and simple hot meals
Wi-Fi: Rarely available, and slow when it is
Mobile Network: Very limited or unavailable
Electricity: Limited; charging is usually expensive
Hot Shower: Rarely available, and often costly
ATM: Not available, so carry enough cash
Difficulty: Moderate to challenging
Altitude Risk: High
Day 8: Trek Thorong Phedi via Thorong La Pass (5,416 m) to Muktinath (3,800 m)
Max Altitude: 5,416 m (17,769 ft)
Altitude Gain: 996 m up to the pass, followed by a descent of 1,616 m to Muktinath
Duration: 7 to 8 hrs trekking
Distance: Approx. 16 to 17 kilometers
Meals: Breakfast, Lunch, & Dinner
Accommodation: Teahouse
Mode of Transportation: Trek
Day 8 is the central part of the journey. Our departure is before sunrise, meaning that we have to walk in the darkness and cold of the morning using our headlamps. The way consists of a steep slope out of the Phedi that then leads further to a climbing route up to the Thorung La mountain. The passage through the pass sometimes takes four or five hours. At the top, you will find several prayer flags fluttering in the wind as well as a small teahouse denoting that you have reached the highest point of the trek.
The time for celebration comes to an end, and we get ready to make a long descent from the top. The trail descends about 1,600 meters until we reach Muktinath, which has a height of 3,800 meters and is marked as circle number 8 on the map. The landscape changes as we go down, from ice, rock, and snow to the dry, orange terrain of Mustang. The map indicates that Muktinath has an icon of a temple, as it is one of the holiest places in Nepal for Hindus as well as Buddhists. The elevation has this day called "7/8 Hrs", and the blue line has sharply dropped thereafter.
On the map: circle number 8, Thorong La at 5,416 m, the dot marking Muktinath, the temple icon at 3,800 m and the avalanche symbol found in the legend.
About Muktinath
Main Highlights: Muktinath Temple, 108 water spouts, the eternal flame shrine, and views of Dhaulagiri and Nilgiri
Accommodation: Local teahouses and lodges, often with better beds than higher stops
Meals: Dal bhat, noodles, fried rice, soups, pasta, and a wider menu
Wi-Fi: Often available for an additional fee
Mobile Network: Available but can be patchy
Electricity: Available; charging may cost extra
Hot Shower: Usually available for an extra charge
ATM: Not reliably available, so carry enough cash
Difficulty: Challenging
Altitude Risk: High on the pass, moderate at Muktinath
Day 9: Trek Muktinath to Jomsom (2,720 m) via Kagbeni and Jhong
Max Altitude: 3,800 m (12,467 ft)
Altitude Gain: 0 m (a descent of 1,080 m)
Duration: 6 to 8 hrs trekking
Distance: Approx. 20 to 23 kilometers
Meals: Breakfast, Lunch, & Dinner
Accommodation: Teahouse
Mode of Transportation: Trek
The day starts with a trip to the Muktinath Temple complex, which has a long pilgrimage history and is a tranquil place. We then begin descending into Kali Gandaki Valley, which is considered one of the deepest river gorges in the world and is situated between the Annapurna and Dhaulagiri mountains. The course of the route goes through Jhong, which is a walled town of old stone houses and continues to Kagbeni, a medieval town that is known as the entrance to upper Mustang. This is a valley that offers numerous alternative routes but is mainly located at an altitude of approximately 2800m.
The scenery here is arid, breezy and yellow. The route is comprised of both river channels and highways, with heavy winds in the evening. We make slow progress down the valley until we reach Jomsom, the administrative part of Mustang. The map indicates the place to be at an altitude of 2,720 m, at circle number 9, while also displaying the logo of an aircraft nearby. Jomsom marks the conclusion of the principal trek. The altitude graph defines this day as "6/8 Hours", thus showing a decline to around 2,700 m.
On the map: circle number 9, Jomsom at 2,720 m, Kagbeni, the dashed, less important paths, and the plane logo close to Jomsom.
About Jomsom
Main Highlights: Kali Gandaki Valley, Jomsom airport, Thakali culture, and views of Nilgiri and Dhaulagiri
Accommodation: Local teahouses and lodges, many with attached bathrooms
Meals: Dal bhat, noodles, fried rice, pasta, apple pies, and local Thakali dishes
Wi-Fi: Usually available, sometimes for an additional fee
Mobile Network: Available and generally reliable
Electricity: Available; charging may cost extra
Hot Shower: Usually available
ATM: Available, but it can be unreliable, so carry enough cash
Difficulty: Moderate
Altitude Risk: Low
Day 10: Drive from Jomsom to Pokhara (820 m)
Max Altitude: 2,720 m (8,924 ft)
Altitude Gain: 0 m (a descent of 1,900 m)
Duration: 8 to 10 hrs drive, or about 25 min by flight
Distance: Approx. 160 to 165 kilometers by road
Meals: Breakfast
Accommodation: Hotel in Pokhara
Mode of Transportation: Jeep or flight
On the final day, you have two options for leaving the mountains, and the map shows both. The flight from Jomsom to Pokhara would take 25 minutes, which the elevation chart labels "25 Mins," and the dotted line on the western edge of the map shows the route the plane would take from one airplane icon to the next. The views of the Dhaulagiri and Annapurna ranges from above the clouds are simply indescribable.
The road to Pokhara would take you through the Kali Gandaki Valley to the south. You would pass Marpha, Tatopani (1,200 m) and Nayapul (1,010 m) on your way to Pokhara at 820 m, and it would take 8 to 10 hours to reach your destination. The road winds through apple orchards, waterfalls, hot springs and terraced hills. Pokhara is marked with a circle number 10 and a lake icon so you can picture a peaceful ending to the trek. From Pokhara, you can drive or fly to Kathmandu or to your next destination if the red driving line on the map is any indication.
On the map: circle 10, Pokhara at 820 m, the lake icon, the airplane icons, the dots for Marpha, Tatopani and Nayapul and the red driving line back toward Kathmandu.
About Pokhara
Main Highlights: Phewa Lake, lakeside cafés, the World Peace Pagoda, and views of the Annapurna range
Accommodation: Hotels and guesthouses at every budget level
Meals: Nepali, Tibetan, Indian, and international restaurant meals
Wi-Fi: Widely available, often free
Mobile Network: Available and reliable
Electricity: Available throughout
Hot Shower: Available
ATM: Widely available
Difficulty: Easy
Altitude Risk: None
Optional Variations Shown on the Map
The map also shows a few ways to vary the route – all of these are part of the same map and hence are natural variations on the circuit:
Tilicho Lake extension: The orange line follows the trail from Manang through Shio Kharka and Tilicho Base Camp to the lake at 4,920 m. This is an added two- or three-day detour
Larke Pass link: The dotted line from Dharapani heads off towards the east and up to the fabled Larke Pass and on into the Manaslu region
Southern walk-out: The orange line from Jomsom goes through Marpha, Tatopani, Ghorepani and Nayapul to Pokhara, and is an alternative to the morning flight or the long drive back that some trekking companies offer
Poonhill side-trip: A short stub from Ghorepani leads off to Poonhill at 3,210 m, a popular viewpoint for sunrise
High Camp option: On Day 7, as an alternative to staying at Phedi, you can choose to sleep at Thorong High Camp.
Flight or road: On Day 10, you can decide between the 25-minute flight and the 8- to 10-hour drive back to Pokhara
We are pleased to offer the flexibility of tailoring your journey to your desired duration and places, as a shorter, longer or more relaxed version of this route.
Frequently Asked Questions About the Short Annapurna Circuit Map and Itinerary
What is the orange line on the map?
The orange line depicts the trekking route, that is, the hiking trail from Dharapani to Chame, Pisang, Manang, Yak Kharka and Thorung Phedi, across Thorung La to Muktinath, Kagbeni and Jomsom. It also shows an optional side-trip to Tilicho Lake and another walk-out on the southern route to Pokhara.
What is the red line on the map?
The red line depicts the driving route; that is, the roads connected to vehicular travel. It shows the link between Kathmandu and Besisahar on Day 1 and back to Pokhara on the return leg (also marked on the map) towards the end of the loop. There is a bus icon above the street to show this. This is basically where the roads that allow the ten-day schedule are.
What do the dotted lines mean on the map?
Dotted lines show additional trails or flight routes. They are shown as alternative routes or option routes that do not apply to the main itinerary. In this case, it shows the trail to Dharapani towards the high-altitude Larke Pass, a loop around Kagbeni and a dotted airplane line from Jomsom to Pokhara.
What are the red numbered circles on the trail?
The red numbered circles indicate the day markers. They represent days of travel in the itinerary, and their placement roughly indicates the area where the overnight camp is located.
The common "4-5" marker in Manang is where you will spend 2 nights, with Day 5 as an acclimatisation day. The marker "10" is for Pokhara.
What is the highest point shown on the map?
The highest point is Thorung La Pass at 5,416 m (17,769 ft). It is crossed on Day 8 between Thorung Phedi and Muktinath and is the climax of the circuit. The avalanche icon in the legend also depicts the high-altitude crossing of this pass.
Which peaks are depicted on the map?
There are 6 peaks shown as icons on the map with corresponding heights in meters. They are Manaslu (8,156 m), Annapurna I (8,091 m), Annapurna II (7,973 m), Annapurna III (7,555 m), Annapurna South (7,229 m) and Tilicho Peak (7,145 m). Each of these is shown at the approximate location of its influence on the trail.
What does the elevation chart show?
The elevation chart (ELEV (M)) shows a blue line indicating overnight camps at various altitudes for Day 1 to Day 10. The red numbers above the line depict the walking or driving hours for each day. It also shows Day 6 as a rest day in Manang, which is shown in the chart with a flatline allowing an easy view of the acclimatization timetable.
Why is there no 5,416 m indicated on Day 8 in the elevation chart?
The elevation chart shows the overnight camping altitude and not the summit altitude for the day. Since Day 8 ends in Muktinath at 3,800 m, the blue line is at this altitude. However, the altitude figure for Thorung La Pass at 5,416 m is shown explicitly on the main map as well as a reflection of the "Climb high, sleep low" principle during the crossing of Thorung La Pass on Day 8.
What is the difficulty grade for this trek?
The trek is graded as Strenuous or Grade C. This indicates that while there are no technical challenges, long walks at high altitude and crossing the high pass on Day 8 require a good level of fitness and acclimatization. The extra rest day in Manang helps with the latter.
How long is the flight from Jomsom to Pokhara?
The flight takes about 25 minutes shown in the Day 10 walking/driving time in the itinerary. The road via Marpha, Tatopani and Nayapul takes 8 to 10 hours. Flights from Jomsom to Pokhara are at the mercy of weather conditions and are scheduled in the mornings before the afternoon gusts of wind rise in the Kali Gandaki Valley.
Dipak starts to step up from porter, guide, and trekking leader to the company owner. Sometimes he share his experience with others as well as wrote in local travel news. Most of time he spend his time on mountain and his company.
 Altitude