Nepal is home to some of the most stunning and difficult peaks on the planet. It's situated at the foot of the Himalayas. Adventure seekers from all over the globe come here to challenge themselves on the majestic peaks. Of all the adventures to be had there, there are three peaks for those who are serious about mountain climbing. But they don't want to spend years training for the experience: Lobuche Peak, Island Peak, and Mera Peak.
Every one of these peaks offers a set of challenges that aren't found anywhere else. Also, each offers a different set of lessons for those who tackle it. Climbers who attempt all three peaks at once offer themselves a challenge. It's among the most comprehensive mountaineering challenges found anywhere on the face of the earth.
Before discussing the problems, you must first understand the uniqueness of these "trekking peaks." The Nepal Mountaineering Association has defined certain mountains to be trekking peaks. These mountains are usually between 5,500 and 6,500 meters high. They're climbed using mountaineering techniques and equipment. But they don't demand the same level of expertise necessary to climb an 8,000-meter giant such as Everest.
Don't be fooled by the word "trekking." The fact is, these peaks are still very challenging. Altitude, climbing, weather, and exhaustion are very real dangers. On these trekking peaks, climbers die every year. It takes the right preparation, the right guides, and the right attitude.
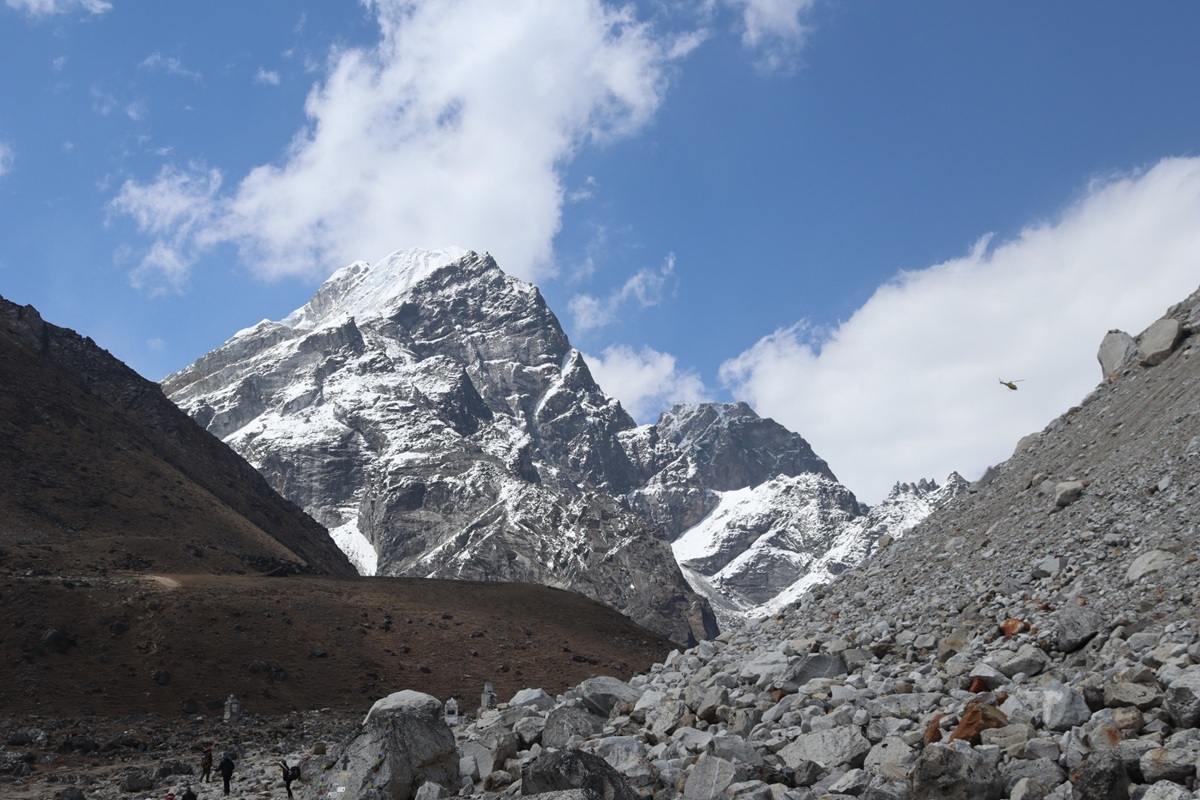
Lobuche Peak stands at 6,119 meters (20,075 ft) in the Khumbu region, close to Mount Everest. Lobuche Peak consists of two summits: Lobuche East Peak at 6,119 meters and Lobuche West Peak at 6,145 meters. Climbers mostly attempt Lobuche East Peak because it is less technical compared to Lobuche West Peak. A ridge separates the two summits, and traversing it is extremely technical.
The summit has a name derived from the village of Lobuche, located close to the popular Everest Base Camp trekking route. This village is home to thousands of trekkers annually descending during their ascent above the peak.
Official Height
6,119 meters (20,075 feet)
First Ascent
1984 by Laurence Nielson and Sherpa Ang Gyalzen
Location
Khumbu region, Solukhumbu District
Nearest Village
Lobuche (4,940m)
Climbing Season
March-May, September-November
Average Success Rate
40-50%
Permit Cost
$250-400 USD
Typical Climbing Days
3-4 days from the village
The Technical Challenges of Lobuche
Lobuche is the most technical of the three mountains. This mountain requires serious mountaineering skills. And it's not a simple hike to a high altitude.
There will be a few sections on the hike that'll be challenging to tackle. Proper skills and gear will be necessary to overcome these sections.
The initial part of the climb involves a rocky path from the base camp to the high camp. In this part, you don't need to use technical climbing equipment. But the high altitude will challenge your endurance levels. From the high camp, the actual climbing takes place in the early morning darkness.
You'll go through glaciated slopes, with crevasses concealed by snow bridges. One misstep, and you could find yourself falling into the icy chasm.
Following the glacier area, you get to the steep slopes of the snow. The gradient gets steeper, reaching 40-50 degrees in some spots. Crampons dig into the hard snow as you kick-step up. Breathing is not sufficient at this height. Your legs are burning from the exercise. But you have to be alert, since a single slip will send you tumbling a long, hazardous way.
The toughest part of this climb comes near the summit. The ice wall and ridge are steep. Fixed ropes assist in climbing. But proper ice climbing skills are necessary. The feeling of being exposed on both sides of this ridge can make your heart pound. The wind can howl in this exposed part, making it even harder to balance. In this part of your climb, your ice axe will be your best friend.
Lobuche Climbing Breakdown by Section
Section
Elevation
Distance
Technical Grade
Time Required
Main Hazards
Village to Base Camp
4,940m to 4,950m
2 km
Hiking
3-4 hours
Altitude, rocks
Base Camp to High Camp
4,950m to 5,400m
1.5 km
Scrambling
4-5 hours
Loose rocks, altitude
High Camp to Glacier
5,400m to 5,600m
0.5 km
Easy climbing
1-2 hours
Dark, cold
Glacier Section
5,600m to 5,800m
1 km
Moderate
2-3 hours
Crevasses, ice
Steep Snow Slopes
5,800m to 6,000m
0.8 km
Difficult
2-3 hours
Avalanche, falls
Ice Wall and Ridge
6,000m to 6,119m
0.3 km
Very Difficult
1-2 hours
Exposure, ice falls
Summit to Base Camp (descent)
6,119m to 4,950m
All sections reversed
Variable
4-6 hours
Fatigue, loose rocks
Physical Challenges on Lobuche
But aside from the technical aspect, Lobuche will push your physical endurance. Climbing begins at midnight or 1 AM. It'll take 8-10 hours. After that, you'll descend while physically drained. The altitude gain from high camp to the peak is over 700 meters. That doesn't seem like much. But at such high altitude, it makes a big difference.
At 6,000 meters, your body has trouble functioning. The oxygen available is only 50% of sea level. Each step is an effort. It becomes hard to breathe, and you gasp for air. Your heart is thumping. Even simple efforts, pulling new gloves over their hands or sipping water, are strenuous.
Climbing is hard in the cold. Temperatures can drop as low as -20°C at higher camps. On the last ascent, with wind effects, it feels like -40°C; your fingers and toes start to lose sensation through thick gloves and boots. But you’ve got to keep going if you don’t want to get cold. But the farther you go, the tireder you get. That balance between the need for speed and saving energy is important to get right.
Weather and Environmental Challenges
The weather in Lobuche can turn bad in an instant. It is close to the Himalayan range itself, which has its own weather patterns. A storm can move in unexpectedly, bringing high winds, snow, and a total absence of visibility.
The wind is always a problem, especially on the ridge as one approaches the summit. It may push you off balance or make rope climbing perilous. The wind chill factor reduces the temperature considerably. Some attempts to reach the summit may fail not because one cannot reach the summit, but because the conditions created by the wind may be too hazardous.
Weather Factor
Spring (Mar-May)
Autumn (Sep-Nov)
Impact on Climbing
Temperature Range
-15°C to +5°C
-25°C to 0°C
Frostbite risk, equipment issues
Wind Speed
20-40 km/h
30-50 km/h
Balance problems, wind chill
Precipitation
Low to Moderate
Very Low
Snow accumulation, avalanche
Visibility
Good, afternoon clouds
Excellent
Navigation, safety
Storm Frequency
Moderate
Low
Trip delays, danger
Psychological Challenges Exclusive to Lobuche Peak Climbing
Lobuche is more mentally taxing than the first two peaks. The technical parts of this ascent call for your undivided attention. But your body is lacking oxygen to your brain. It's essential to make sound judgments even when your mind is foggy.
Fear management becomes a consideration for the exposed parts. Peering over the edge of the ridge from the top shows massive drops on either side. Your rational brain understands the fixed ropes will support you. But your emotional brain is screaming at you in alarm. Recognizing the presence of fear without being controlled by it is what separates the successful climber from the one who turns back.
The mountain will also try your patience. Delays due to weather will mean waiting at base camp or high camp for extended periods of time. Sometimes for days. You're sitting in your tent, consuming your rations and fuel. You'll wonder when your chance at the summit will come.
The Island Peak Challenges
Island Peak In the View
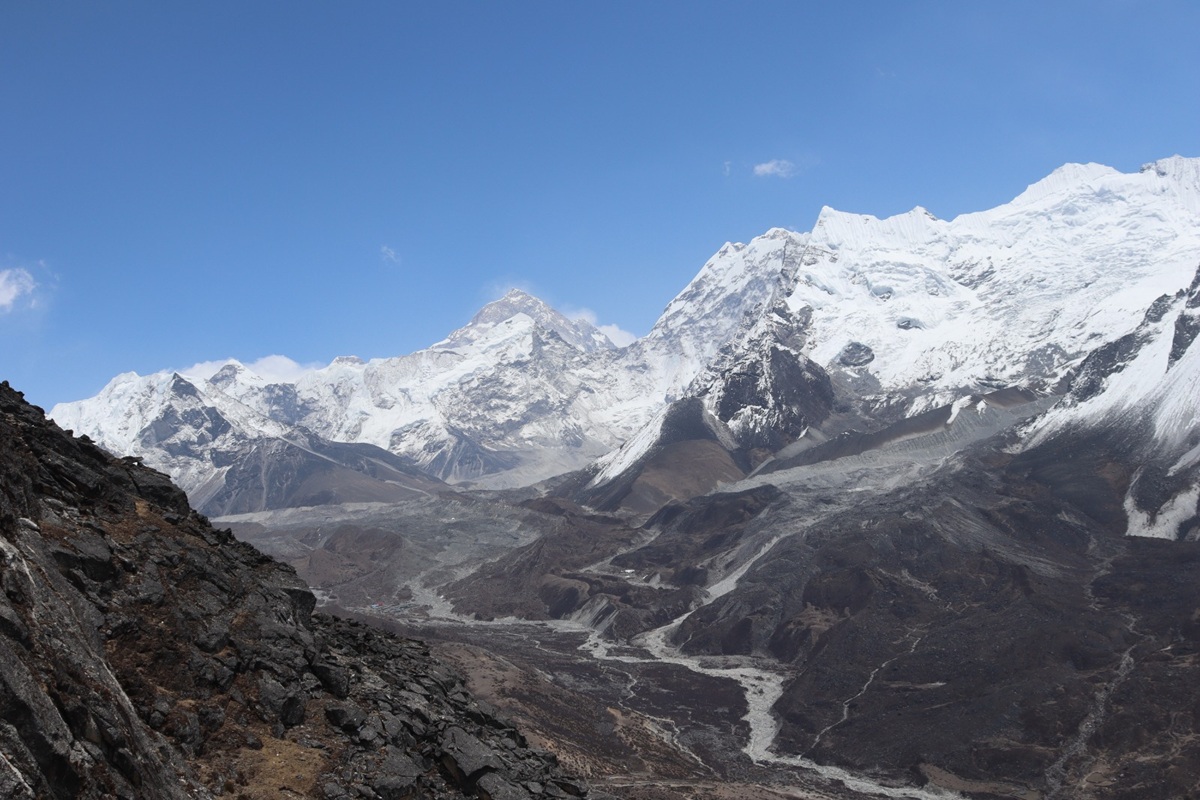
Island Peak has a height of 6,189 meters (20,305 feet), which is a little higher than Lobuche's peak. The actual name of the peak in Nepali is Imja Tse, but it is commonly known as Island Peak. This is because the peak looks like an "island" in the "sea of ice." This name was given to it by the British climbers in 1953.
The mountain is located in the Khumbu region, close to the village of Chhukung. It is part of the south ridge of Lhotse Shar, a mountain that connects to the famous peak of Lhotse, which at 27,940 feet is the fourth-tallest peak in the world. This makes the ascent of Island Peak a highly sought-after achievement, as it is climbed in full view of its cousin Lhotse.
Official Height
6,189 meters (20,305 feet)
Official Name
Imja Tse
First Ascent
1953 by a Swiss team
Location
Khumbu region, Chhukung Valley
Nearest Village
Chhukung (4,730m)
Climbing Season
March-May, September-November
Average Success Rate
60-70%
Permit Cost
$250-350 USD
Typical Climbing Days
3-4 days from village
The Headwall: Island Peak's Defining Challenge
Island Peak is renowned for one particular challenge: the headwall. The headwall slopes back at 45-50 degrees over a distance of 100-150 meters. Fixed ropes are in place on the headwall. They enable climbers to climb it using jumars (mechanical ascenders). But climbing the headwall requires skill and guts.
You climb towards the headwall after crossing the glacier. It's pre-dawn, and the darkness makes the climb rather challenging. But the sky begins to brighten, indicating the approach of dawn. You notice the wall looming above you. It looks very steep when viewed from the bottom. It may give you a few nervous moments, particularly if this is your first time for such a climb.
The actual ascension requires the use of both the legs and the arms. You attach your jumar to the fixed rope. After that, you begin the process of ascension. Your legs push the snow, which turns into steps. Your hands are pulling the rope, which assists in lifting your body weight. The exposure increases with each step you take. You find yourself looking at a steep drop into the glacier below.
Headwall Section Breakdown
Details
Height of Headwall
100-150 meters
Average Angle
45-50 degrees
Steepest Section Angle
55-60 degrees
Climbing Time (Ascent)
1.5-2.5 hours
Climbing Time (Descent)
1-1.5 hours
Fixed Rope Length
Approximately 200 meters
Number of Rope Sections
3-4 sections
Rest Ledges Available
2-3 small ledges
Main Technique Required
Jumar ascending, front-pointing
Difficulty Rating
Alpine PD (Peu Difficile)
Glacier Navigation Challenges
Before you even get to the headwall, you have to cross the glacier. Glacier travel poses its own dangers, which often get underestimated by climbers. Crevasses lie hidden beneath snow bridges. They may or may not be strong enough to hold your weight. Also, route-finding becomes essential, especially in flat light.
The rope is tied together for glacier travel. If one member falls through a crevasse, the others can catch the fall and complete a rescue. This camaraderie brings a social element to the experience. Trust is a necessity among the group, both for your life and theirs. Plus, communication is a key component for route-finding through crevasses.
The glacier is also constantly changing. Trails that were good yesterday may be different today because of new crevasses. A snow bridge, which may be strong in the morning, may be weak by afternoon. This is one of the factors that the guide must be able to read and interpret.
Physical Demands of Island Peak
The ascent to the summit of Island Peak is one of the longest and most draining experiences that most people will ever go through. You will usually start the ascent at either 12:00 AM or 1:00 AM, preparing gear in the darkness, before setting off at 2:00 AM. The return journey from the high camp to the summit and back would take 10-12 hours.
The altitude is 6,189 meters. This is not just tough on your body. It works at only 50% efficiency. Simple tasks such as putting on your harness or adjusting your backpack straps make your lungs work hard. Climbing the head wall requires regular breathing pauses to catch your wind while clipped to the fixed rope.
Physical Challenge
Intensity Level
Duration
Energy Expenditure
Recovery Time
High camp to glacier
Moderate
2-3 hours
600-800 calories
Minimal
Glacier crossing
Moderate-High
1-2 hours
400-600 calories
15-20 minutes
Headwall ascent
Very High
1.5-2.5 hours
800-1200 calories
30-45 minutes
Summit ridge walk
High
30-45 minutes
300-400 calories
10-15 minutes
Summit to high camp
High
4-6 hours
1000-1500 calories
Hours/days
Total summit day
Extreme
10-12 hours
3500-5000+ calories
2-3 days
Weather Considerations for Island Peak
The weather patterns for Island Peak are similar to those of Lobuche, but the presence of the headwall introduces its own difficulties. The strong wind makes the headwall very challenging, if not outright hazardous. Climbers have to lean against the slope in order not to get blown backwards. The wind makes the climber susceptible to frostbite.
The snow conditions on the headwall can vary greatly depending on temperature and weather. Hard, icy conditions make it easier to front-point but make fall consequences worse. Soft, sugary snow is more treacherous for crampons, making climbing more strenuous. Fresh snow can avalanche off the headwall, but this is a rare phenomenon.
The threat of weather deterioration in the afternoon is real. Many teams reach the summit late in the morning. They're forced to descend through increasingly poor weather. Clouds roll in, visibility decreases, and the temperature sinks. Climbing down the headwall under such circumstances is extremely hazardous. And it may take longer than the climb.
Mental Challenges on Island Peak
The headwall is quite a psychological challenge for climbers. You have to overcome your fear of exposure and heights while your mind is functioning in low-oxygen conditions. Some climbers freeze on the headwall, unable to climb down or climb up without instructions from guides.
Crowding can also lead to mental stress. Island Peak is a very popular peak, and sometimes 30-50 people climb the summit in one day. Traffic jams are formed in the fixed ropes, particularly in the headwall. Waiting in line, observing others struggling, can dent your confidence or raise your anxiety level.
The final psychological hurdle is posed by the summit day. After 8 to 9 hours of climbing, when one finally reaches the summit, one realizes that one has only reached the midpoint of the journey. One has to descend safely when one is exhausted. It is not easy to remain focused when one is exhausted and deprived of oxygen.
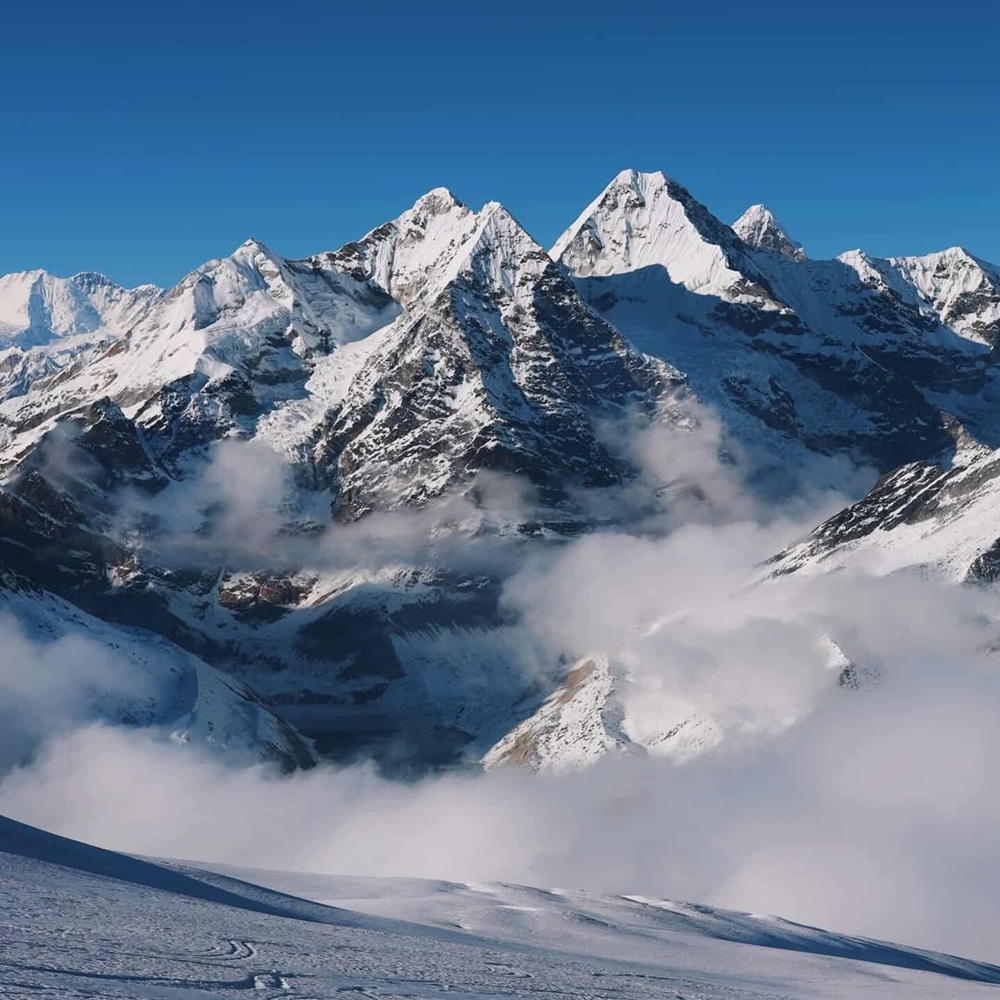
The height of the Mera Peak is 6,476m or 21,247ft, making it the highest trekking peak in Nepal, as well as the highest of the three peaks we will climb. There are three summits on the peak, which are: Mera North, 6,476m, Mera Central, 6,461m, and Mera South, 6,065m. Climbers mostly ascend the Mera Central summit, which is the most preferred one.
In contrast to Lobuche and Island Peak, which are located in the highly touristed Khumbu, Mera Peak is found in the relatively isolated Hinku Valley. This makes the mountain itself appear much more untamed and remote. The trekking route leads you through forests, valleys, and mountain passes, all of which are well out of the way of the tourist trail.
Official Height
6,476 meters (21,247 feet)
Three Summits
North (6,476m), Central (6,461m), South (6,065m)
First Ascent
1953 by Col. Jimmy Roberts and Sen Tenzing
Location
Hinku Valley, Makalu-Barun region
Nearest Village
Khare (5,045m)
Climbing Season
March-May, September-November
Average Success Rate
75-85%
Permit Cost
$250-350 USD
Typical Climbing Days
4-5 days from Khare
The Altitude Challenge: Mera's Defining Feature
The biggest challenge with Mera Peak isn't its technicalities but its height. You'll be climbing to 6,476 meters, which is higher than most people will climb in their lifetime. All the organs in your body feel the effects of the height. Your brain will swell slightly due to the low air pressure. Breathing will become difficult because you won't be able to extract enough oxygen from the air you breathe. Your heart will have to work harder to pump blood through your system because it'll be filled with low amounts of oxygen.
"Then there's altitude sickness, which becomes a problem on Mera. Even if you've been just fine with altitude on other expeditions, you can develop issues here. Headaches, nausea, dizziness, and utter exhaustion are not uncommon among climbers. Sleeping at high camp becomes problematic because your breathing rate changes. You might even develop Cheyne-Stokes respiration, in which your breathing stops and starts erratically.
Altitude Zone
Elevation Range
Oxygen Availability
Common Symptoms
Acclimatization Time
Moderate Altitude
2,500-3,500m
85-75% of sea level
Mild breathlessness
1-2 days
High Altitude
3,500-5,500m
75-50% of sea level
Headache, sleep issues
3-7 days
Very High Altitude
5,500-6,500m
50-40% of sea level
Severe fatigue, nausea
7-14 days
Extreme Altitude (Mera Summit)
6,476m
42% of sea level
All symptoms severe
Continuous process
Long Approach Trek Challenges
Mera Base Camp Trek will take you 7-10 days, depending on your itinerary. The long approach to this trek is not without its advantages. It gives your body time to acclimatize to the altitude. The actual trek, though, is not an easy one. There are several high passes you will need to get over, including the Zatrwa La at an altitude of 4,600 meters. These passes entail hiking uphill, followed by a downhill trek. This type of hiking, where you climb high, sleep low, is an effective way of acclimatizing, but your body will be working all the time, so your legs will always be tired.
The remoteness of the Hinku Valley means limited facilities. Teahouses exist in some villages, but camping becomes necessary in higher areas. You'll deal with basic toilets or no toilets at all. Food options become limited. The adventure feels more primitive and wild than the touristy Everest region trails.
Approach Trek Section
Days Required
Highest Point
Terrain Type
Accommodation
Difficulty
Lukla to Paiya
1 day
2,840m
Forest trails
Teahouse
Easy
Paiya to Panggom
1 day
2,850m
Valley walking
Teahouse
Easy
Panggom to Ningsow
1 day
2,863m
River valleys
Teahouse
Moderate
Ningsow to Kothe
2 days
3,691m
Climbing to altitude
Teahouse
Moderate
Kothe to Thaknak
1 day
4,358m
High altitude
Teahouse/Camping
Hard
Thaknak to Khare
1 day
5,045m
Very high altitude
Camping
Hard
Khare acclimatization
1-2 days
5,045m
Rest
Camping
N/A
Summit Day: The Ultimate Endurance Test
The day of summiting Mera Peak will put your endurance to the test in a way that few other activities can. You'll start your day at midnight in a high camp (5,800m). You're sure to have gotten little sleep because of altitude. The task of dressing in such cold temperatures takes longer than usual. Your fingers aren't functioning well, nor is your thinking.
But actually, climbing is walking up snow slopes for 6-8 hours. Technical difficulty is minimal, just walking with crampons. But altitude makes everything extremely difficult. You can take five or six breaths for every step. You have to stop to rest, leaning over an ice axe, gasping for air.
The mental toughness of this never-ending hike is what breaks most people. The top seems no closer as you hike up. Your legs feel as if they're made of lead. Each cell of your body is screaming for you to stop and turn back down where there is more oxygen.
Weather and Environmental Factors
Mera Peak is situated relatively far from civilization, which influences the weather on the mountain. Mera Peak gets slightly fewer trekkers compared to Island Peak.
This makes route finding difficult when the weather is not clear. The tracks are quickly covered with new snow, and one may be the first to break trail on the mountain. The winds that hit the ridge are quite strong. This is because there are no barriers to shield you from the weather that comes from any direction. During the day you spend climbing the summit, you are vulnerable to the weather. In case the weather turns against you, you would not have many places to take cover.
Weather Hazard
Frequency
Danger Level
Warning Signs
Response
High winds (50+ km/h)
Common
High
Lenticular clouds, sudden gusts
Consider turning back
Whiteout conditions
Moderate
Very High
Increasing cloud, snow
Stop immediately, shelter
Extreme cold (-30°C+)
Common in autumn
High
Clear skies at night
Extra insulation, watch for frostbite
Avalanche risk
Low to Moderate
Critical
Fresh snow, warming temps
Avoid steep slopes, early start
Altitude storms
Occasional
Very High
Rapid pressure drop
Descend immediately
The View: Mera's Greatest Reward
Mera Peak has the finest summit view of any trekking peak in the Himalayas. On a clear day, one can see five of the fourteen 8,000-meter peaks in the world: Everest (8,849m), Lhotse (8,516m), Cho Oyu (8,188m), Makalu (8,485m), and Kanchenjunga (8,586m). Dozens of other mountains are visible in the distance.
This gives you very strong motivation to push past the last few hours of climbing. When you finally reach the top and look out at this incredible view, the pain that you felt climbing up to this point is put into perspective. Many people will attest that their experience on the top of Mera is one of the most significant experiences they will ever have.
Comparing the Three Individual Peak Challenges
Having discussed the challenges associated with each peak, let's now compare these challenges directly. It's essential to note that understanding these differences helps climbers prepare for the mountain they will be climbing.
Technical Difficulty Comparison
Peak
Rope Work
Ice Climbing
Crevasse Danger
Exposure
Overall Technical Grade
Lobuche
Extensive fixed ropes, glacier ropes
Steep ice wall, front-pointing required
Moderate
Very high on summit ridge
Alpine PD+
Island Peak
Fixed ropes on headwall, glacier ropes
Headwall climbing, crampon use
Moderate
High on headwall
Alpine PD
Mera Peak
Minimal rope use, glacier ropes
Basic crampon walking
Low to moderate
Low except summit ridge
Alpine F
Physical Demand Comparison
Peak
Summit Day Duration
Elevation Gain (Summit Day)
Cardio Intensity
Strength Required
Recovery Time
Lobuche
8-10 hours
719 meters
Very High
High (arms and legs)
2-3 days
Island Peak
10-12 hours
589 meters
Very High
Very High (full body)
2-4 days
Mera Peak
8-10 hours
676 meters
Extreme
Moderate (legs only)
3-5 days
Altitude Impact Comparison
Peak
Maximum Elevation
Time Above 5,500m
Oxygen Availability
AMS Risk
HACE/HAPE Risk
Lobuche
6,119m
12-16 hours
48% of sea level
High
Moderate
Island Peak
6,189m
12-18 hours
47% of sea level
High
Moderate
Mera Peak
6,476m
16-24 hours
42% of sea level
Very High
High
Success Rate and Failure Factors
Peak
Success Rate
Main Failure Cause #1
Main Failure Cause #2
Main Failure Cause #3
Lobuche
50-60%
Technical inability
Weather conditions
Altitude sickness
Island Peak
60-70%
Physical exhaustion
Altitude sickness
Fear/mental block
Mera Peak
75-85%
Altitude sickness
Weather conditions
Physical exhaustion
The Combined Three-Peak Challenge
It is a totally different experience to climb all three mountains in a single expedition compared to when climbing the mountains separately. This section will examine the different challenges that come with attempting to conquer the three mountains at the same time.
The Cumulative Fatigue Challenge
The cumulative fatigue is perhaps the most challenging part of this three-peak climb. Your body never really gets to recover. When you climb Mera, you'll take two to three days to reach the Island Peak region. But this is considered your "rest" time, and this is while you're trekking, backpack and all, at high altitude. Your body doesn't really recover. Your energy reserves aren't replenished.
Also, when you tackle Lobuche Peak as your third summit, your body has been working hard for at least three or four weeks. You have not had a good night's sleep for the past four weeks because of altitude sickness. You have been burning more calories than you have been consuming, and this has made you lose weight and develop weak muscles.
Expedition Phase
Days Elapsed
Cumulative Elevation Gain
Recovery Level
Injury Risk
Performance Level
Pre-Mera Trek
Days 1-8
6,000-8,000m
Good
Low
100%
Mera Climb
Days 9-12
+3,000m
Moderate
Moderate
90-95%
Mera to Island Trek
Days 13-16
+2,000m
Poor
Moderate-High
80-85%
Island Climb
Days 17-20
+2,500m
Poor
High
70-80%
Island to Lobuche Trek
Days 21-22
+1,000m
Very Poor
High
65-75%
Lobuche Climb
Days 23-24
+1,200m
Extremely Poor
Very High
60-70%
Physical Demand
Days
Physical Intensity
Mental Intensity
Technical Difficulty
Recovery Opportunity
1-2
Low
Low
None
Excellent
3-5
Moderate
Moderate
None
Good (Day 5)
6-8
Moderate-High
Moderate
None
Good (Day 8)
9-11
High
High
None
Moderate
12-14
Very High
Very High
High
Poor to Moderate
15-16
Moderate
Moderate-High
Low
Moderate
17-18
Very High
Very High
Moderate-High
Poor to Moderate
19-20
Extreme
Extreme
Very High
Very Poor
21-23
High
High
Moderate
Poor
24-25
Extreme
Extreme
Low-Moderate
Very Poor
26-28
Moderate
Low-Moderate
None
Improving
29-30
Low
Low
None
Excellent
The Mental Fatigue Challenge
Mental fatigue may even be greater than physical fatigue. Living in tents, tolerating the cold, handling basic hygiene issues, consuming repetitive meals, and being uncomfortable for weeks can be mentally draining. The constant mild hypoxic condition due to high altitude can impact your mood and make you more irritated and emotionally unstable.
Your decision-making ability deteriorates as time goes on in the expedition. By week three, you will be making life-or-death decisions using a body that has been deprived of oxygen for several weeks. You may be poor at recognizing when you make bad decisions. This is when the expertise of guides becomes essential because they can assess when their team members are struggling mentally and make decisions based on that.
Having two summits in your background adds psychological pressure. If you have conquered Mera Peak and Island Peak, you are eager to complete your trilogy. However, this eagerness can sometimes make you take risks in Lobuche. Handling this conflicting desire—between adventure and safety is not easy even for experienced climbers.
The Strategic Planning Challenge
proper planning and strategy. You need to decide which summit to climb first and then leave days for acclimatization.
The most common route is to climb Mera first, followed by Island Peak, and then Lobuche. This is sensible for several reasons:
Mera because it offers superb acclimatization without any technical difficulty. You build confidence with high altitude before moving to technical sections.
Island Peak comes next, as you are already well acclimatized and can concentrate on learning technical skills. The headwall is where you learn ice climbing skills, which come in handy for Lobuche.
Lobuche is the last climb because it requires the most technical expertise, and you get to use all your experience. You are also most acclimatized by now.
Climbing Order
Advantages
Disadvantages
Best For
Mera → Island → Lobuche
Progressive difficulty, good acclimatization
Long expedition, cumulative fatigue
Most climbers
Island → Lobuche → Mera
Technical skills first, finish on highest peak
Less acclimatization for technical peaks
Strong technical climbers
Lobuche → Island → Mera
Hardest first, downward progression
Poor acclimatization, high risk
Not recommended
The Logistics and Coordination Challenge
The logistics of a three-peak trek are quite challenging. You require permits for three peaks, camping gear for the three different base camps, and enough food for a period of 20-25 days. Additionally, the weather windows will have to coincide on all three peaks.
Your team needs to coordinate its movement between regions. The trekking route between Mera Peak and Island Peak involves crossing high passes. The trek takes several days. The gear needs to be organized in a way that you don't have to carry everything with you. Some of this gear will be carried to other locations by porters.
Communication can be difficult in more remote regions. Not everywhere will have cell phone reception or Wi-Fi access. Your team must stay in communication with weather prognosticators, helicopter services (should you need to be evacuated), and base camp staff in various regions.
Days
Accommodation Type
Facilities Available
Comfort Level
Notes
1-2
Hotel in Kathmandu
Hot shower, WiFi, restaurant
High
Modern amenities
3-5
Teahouse (Phakding, Namche)
Basic shower, WiFi, meals
Moderate
Tourist infrastructure good
6-9
Teahouse (Tengboche, Dingboche, Lobuche)
Limited hot water, some WiFi
Moderate-Low
Colder, more basic
10-11
Teahouse (Gorak Shep, Lobuche)
Very basic, minimal facilities
Low
Highest permanent lodges
12-14
Tented camp (Lobuche climb)
No facilities, outdoor toilet
Very Low
Full camping mode
15-16
Teahouse/Camp (Chhukung, Island BC)
Minimal facilities
Low
Mix of lodge and camp
17-18
Tented camp (Island Peak)
No facilities
Very Low
Expedition camping
The Acclimatization Balance Challenge
Acclimatization on an expedition involving three peaks is a balance that needs to be struck. You need to climb high enough without suffering from altitude sickness, but not too high if you are to complete your expedition within a reasonable time. This becomes even more difficult when your body gets exhausted.
The normal “climb high, sleep low” rule applies here, but doing this three times can be a bit complicated. Since you have climbed Mera Peak with a height of 6,476 meters, your body is well-acclimatized to high altitude. Nevertheless, during your trek to Island Peak, you will have to descend to lower elevations. Some of your acclimatization will be lost.
The physical strain of cumulative climbing can actually make it more difficult for your body to acclimate. Because you are so tired and so malnourished, your body has a hard time producing the extra red blood cells that it needs for altitude adjustment. It is a difficult position to be in, as you want to keep going, but your body needs a break.
Living with the same small group under stressful conditions for 3–4 weeks can be tough, and it can pose some special interpersonal problems. Also, team members may have different pace rates, recovery rates, and stress tolerance capabilities. Such factors may easily generate interpersonal tensions within the group.
For example, a person who climbed Mera effortlessly may have trouble with the headwall on Island Peak. Meanwhile, a different individual who thought Mera was brutally tough may be excellent at the technical climbing required on Lobuche. Plus, such factors can also impact group morale and confidence levels. It becomes necessary to learn to encourage each other when struggling and to be willing to accept the same in return when you’re the one having a hard time.
By day five, personality conflicts that seemed insignificant may start to bubble up, and by day twenty, they can escalate into major issues. Your diet, snoring, or communication style that you found acceptable for a week becomes intolerably frustrating after three weeks of exposure. So, dealing with such interpersonal conflicts demands maturity and lots of patience. On cold nights, you’ll be glad you packed that extra‑warm sleeping bag, but even more grateful for teammates who understand when everyone’s just a bit worn out.
The Weather Window Challenge
Having three good weather windows within one expedition is more complicated. Weather stability is required for summiting, but the arrival of the storm is beyond control. A three-peak expedition is more reliant on luck regarding weather conditions than a single-peak expedition.
At times, you will be forced to wait at one base camp due to weather conditions, and this will consume your schedule. This, in turn, will compress your time to climb other peaks. This will force you to make decisions, such as climbing a mountain when the weather is not good due to time constraints.
Flexibility may be required for the peak order in this trip. If you can’t do Lobuche due to poor conditions but Island looks good, then you might need to swap around the order of ascents for these mountains.
Location
Days
Typical Weather (Spring)
Typical Weather (Autumn)
Kathmandu
1-2, 29-30
Warm, possible rain
Pleasant, clear
Lower Trek (to Namche)
3-5
Mild, some afternoon clouds
Cool, very clear
Mid Trek (to Dingboche)
6-8
Cool, afternoon clouds common
Cold, excellent visibility
High Trek (Lobuche area)
9-14
Cold, variable, snow possible
Very cold, stable
Island Peak area
15-18
Cold, afternoon weather changes
Very cold, morning clarity
Amphu Labsta area
19-20
Unpredictable, technical conditions
Cold, more stable
Mera Peak area
21-25
Cold, isolated storms
Extremely cold, clearer
Return trek
26-28
Warming, more comfortable
Cool but pleasant
Complete Three-Peak Expedition Timeline
Day
Activity
Starting Location
Ending Location
Elevation Range
Purpose
Main Challenge
1
Arrival in Kathmandu
Airport
Kathmandu hotel
1,400m
Arrive safely, rest
Jet lag, travel fatigue
2
Trip preparation and sightseeing
Kathmandu
Kathmandu
1,400m
Permits, gear check, cultural sites
Organization, final shopping
3
Fly to Lukla and trek to Phakding
Kathmandu
Phakding
2,840m to 2,610m
Start trekking expedition
Flight nerves, initial hiking
4
Trek to Namche Bazaar
Phakding
Namche Bazaar
2,610m to 3,440m
Gain altitude, reach Sherpa capital
Steep climb, altitude begins
5
Acclimatization day in Namche
Namche Bazaar
Namche Bazaar
3,440m
Body adjustment to altitude
Patience, mild AMS symptoms
6
Trek to Tengboche
Namche Bazaar
Tengboche
3,440m to 3,860m
Continue to monastery village
Long day, altitude gain
7
Trek to Dingboche
Tengboche
Dingboche
3,860m to 4,410m
Higher altitude village
Increasing altitude effects
8
Acclimatization day in Dingboche
Dingboche
Dingboche
4,410m
Critical altitude adjustment
Headaches, sleep difficulty
9
Trek to Lobuche village
Dingboche
Lobuche
4,410m to 4,940m
Reach first peak base area
High altitude trekking
10
Trek to Gorak Shep and hike to Everest Base Camp
Lobuche
Gorak Shep
4,940m to 5,164m, visit EBC 5,364m
Experience EBC, acclimatization
Very high altitude, long day
11
Hike to Kala Patthar and trek to Lobuche
Gorak Shep
Lobuche
5,545m viewpoint, return to 4,940m
Best Everest views, more acclimatization
Early morning, extreme altitude
12
Climb to Lobuche East High Camp and pre-climb training
Lobuche village
Lobuche High Camp
4,940m to 5,400m
Position for summit, skills practice
Technical training, altitude
13
Summit Lobuche East Peak and descend to Lobuche
Lobuche HC
Summit and back to village
6,119m summit, return to 4,940m
First peak summit achievement
Technical ice climbing, exposure
14
Contingency day for Lobuche summit
Lobuche
Lobuche
4,940m
Weather backup, rest if summited
Weather uncertainty
15
Trek to Chhukung
Lobuche
Chhukung
4,940m to 4,730m
Move to Island Peak area
Recovery from first summit
16
Trek to Island Peak Base Camp and pre-climb training
Chhukung
Island Peak BC
4,730m to 5,150m
Position for second peak, training
Re-acclimatization, skills review
17
Summit Island Peak and return to Base Camp
Island BC
Summit and back to BC
6,189m summit, return to 5,150m
Second peak summit
Headwall climbing, cumulative fatigue
18
Contingency day for Island Peak summit
Island BC
Island BC or Chhukung
5,150m or 4,730m
Weather backup, recovery
Managing uncertainty
19
Trek to Amphu Labsta North Base Camp
Chhukung area
Amphu Labsta North BC
~4,730m to ~5,200m
Position for pass crossing
Remote terrain, preparation
20
Cross Amphu Labsta Pass and descend to South Base Camp
North BC
Amphu Labsta South BC
5,780m pass, descend to ~5,100m
Critical pass crossing to Mera area
Technical pass, altitude, exposure
21
Trek to Seto Pokhari
Amphu Labsta South BC
Seto Pokhari
~5,100m to ~5,035m
Continue to remote valley
Glacier walking, navigation
22
Trek to Kongma Dingma
Seto Pokhari
Kongma Dingma
~5,035m to ~4,850m
Descend toward Mera approach
Long trekking day
23
Trek to Mera High Camp
Kongma Dingma
Mera High Camp
~4,850m to 5,800m
Direct position for final summit
Steep climb, deep fatigue
24
Summit Mera Peak and descend to Khare
Mera HC
Summit and Khare
6,476m summit, descend to 5,045m
Final and highest peak summit
Extreme altitude, exhaustion
25
Contingency day for Mera Peak summit
Khare
Khare
5,045m
Weather backup, recovery
Physical and mental fatigue
26
Trek to Kothe
Khare
Kothe
5,045m to 3,691m
Begin return journey, lose altitude
Long descent, knee strain
27
Trek to Thuli Kharka
Kothe
Thuli Kharka
3,691m to 4,300m
Continue return route
One more climb over pass
28
Trek to Lukla via Zatrwa La Pass
Thuli Kharka
Lukla
4,600m pass, descend to 2,840m
Final trekking day to airport
Last big effort, celebration
29
Fly to Kathmandu
Lukla
Kathmandu
2,840m to 1,400m
Return to civilization
Weather delays possible
30
Final departure from Nepal
Kathmandu
International departure
1,400m
Journey home
Processing experience, goodbyes
Preparing for the Three-Peak Challenge
Physical Training Requirements
In fact, preparing for a three-peak climb is more strenuous than preparing to climb any single peak. Not only must your body prepare for the highest point and most difficult climb, but it must also prepare to maintain this level of activity over a period of weeks.
Training should begin at least six months prior to the trip. Cardio, weights and weighted pack hikes can be a good starting point. The last two months are a time for multiple days of training in order to build up the compounding fatigue that comes with expeditioning.
Training Component
Frequency
Duration
Intensity
Purpose
Example Activities
Cardiovascular endurance
5-6 days/week
45-90 min
Moderate to high
Build oxygen processing
Running, cycling, swimming
Strength training
3-4 days/week
45-60 min
Moderate to high
Build muscle endurance
Squats, lunges, step-ups, core
Hiking with pack
2-3 days/week
3-8 hours
Moderate
Specific preparation
Hill hiking, stair climbing
Back-to-back training
1-2 weekends/month
2 days consecutive
High
Simulate fatigue
Long hikes on consecutive days
Altitude training (if available)
1-2 days/week
60-90 min
Moderate
Altitude adaptation
Altitude chamber, high elevation
Flexibility/yoga
2-3 days/week
30-45 min
Low
Injury prevention
Stretching, yoga, mobility work
Rest days
1-2 days/week
-
-
Recovery
Complete rest or light walking
Mental Preparation for Extended Expeditions
Mental preparation is just as important as physical training when undertaking an expedition involving the three peaks. The ability to deal with uncomfortable, boring, frightening, and frustrating conditions is essential. Visualization, meditation, and other mental training techniques are common practices among successful mountain climbers.
Get used to dealing with discomfort in your training. Live in the snow. Go on training hikes in the rain or snow. Toughen yourself to remain positive when things get tough. These experiences pay off when you are at 6,000 meters, and everything hurts.
Formulate real expectations for the journey. Recognize that you will be uncomfortable most of the time. Recognize that you will have miserable days. When you expect miserable days, it becomes more manageable. But if you expect days filled with adventure and happiness, then miserable days will be considered failures.
Essential Gear for Three Peaks
When it comes to preparing for a three-peak trek, you have to consider both completeness and weight. You have to have gear for all three peaks, but you can’t take everything with you. This is something you have to coordinate with your expedition company.
Gear Category
Essential Items
Weight
Usage
Quality Importance
Can Rent?
Mountaineering boots
Double or insulated boots
1.5-2 kg
All peaks
Critical
Yes
Crampons
12-point steel crampons
900g-1.2kg
All peaks
Critical
Yes
Ice axe
60-70cm technical axe
450-600g
All peaks
High
Yes
Harness
Alpine climbing harness
300-400g
Island, Lobuche
Moderate
Yes
Down jacket
-30°C rated
800g-1.2kg
All peaks, camps
Critical
Yes
Down pants
-20°C rated
500-700g
High camps
High
Yes
Sleeping bag
-30°C rated
1.5-2.5kg
All camps
Critical
Yes
Shell jacket
Waterproof, breathable
400-600g
All conditions
High
Sometimes
Shell pants
Waterproof, durable
350-500g
All conditions
High
Sometimes
Insulated gloves
Multiple layers
300-500g
All peaks
High
Sometimes
Backpack
60-70 liter
2-2.5kg
Carrying gear
High
No
Headlamp
Bright LED, extra batteries
150-250g
Night climbing
Moderate
No
Sunglasses
Category 4 UV protection
50-100g
All days
High
No
Glacier goggles
Full protection
100-150g
High altitude
High
Sometimes
Skills Training for Technical Sections
Before you can even consider doing a three-peak challenge, you should first attend an introductory mountaineering course. This will teach you all the basic skills you will need, such as crampon use, ice axe arrest, rope team travel, and glacier rescue.
You might consider taking an ice climbing course using an indoor ice climbing structure, if there is one in your region. Even a couple of practice sessions on ice will give you an understanding of the movements required to climb very steep ice. This will give you confidence to tackle ice climbing.
Skill
Required For
Learning Curve
Practice Time Needed
Where to Learn
Crampon walking
All three peaks
Easy
2-3 hours
Mountaineering course, snow slopes
Ice axe self-arrest
All three peaks
Moderate
4-6 hours
Mountaineering course, snow slopes
Rope team travel
All three peaks
Moderate
3-5 hours
Mountaineering course
Using fixed ropes
Island, Lobuche
Easy
1-2 hours
Indoor gym, course
Ascending with jumar
Island, Lobuche
Moderate
2-4 hours
Indoor gym, course
Front-pointing
Lobuche
Hard
6-10 hours
Ice climbing course, practice
Crevasse rescue
All peaks (knowledge)
Hard
4-8 hours
Mountaineering course
Snow anchors
All peaks
Moderate
3-5 hours
Mountaineering course
Health and Safety Considerations
Comprehensive Medical Preparation
Medical preparations for an expedition involving three peaks are more complex than a simple health checkup. You must make sure that you are able to withstand high altitudes for a prolonged period. Heart and lung conditions that are not a problem at lower elevations can become life-threatening at 6,000 meters.
Get a complete physical, including a cardiac stress test. Tell your doctor about your plans for the expedition. Some medications have altered effects when taken at high altitudes. Some medical problems, previously under good control, become a concern when the concentration of oxygen is low.
Medical Preparation
Timing Before Trip
Purpose
Cost Range
Importance Level
General physical exam
4-6 months
Overall health assessment
$150-300
Critical
Cardiac stress test
3-5 months
Heart function check
$300-600
Critical for 40+ or risk factors
Pulmonary function test
3-5 months
Lung capacity
$150-400
High
Complete blood count
2-4 months
Anemia, health markers
$50-150
High
Dental examination
2-3 months
Prevent tooth problems
$100-300
Moderate
Eye examination
2-4 months
Vision correction
$150-300
Moderate
Vaccination consultation
2-4 months
Disease prevention
$200-500
High
Altitude medicine consult
1-2 months
Medication prescription
$200-400
High
Medications and First Aid
Personal first aid kits with altitude climbing medications should be with each climber. Diamox (acetazolamide) is for altitude acclimation. Dexamethasone is a lifesaver for altitude sickness. Pain medications, anti-nausea drugs, and antibiotics are other essential medications for a first aid kit.
It is important to discuss these medications with a physician well-versed in altitude medicine. Some medications have side effects that are more noticeable at higher elevations. It is important to follow the dosage correctly, as taking too much Diamox can result in frequent urination and electrolyte disturbances.
Medication
Purpose
Dosage
Side Effects
When to Use
Diamox (Acetazolamide)
Altitude acclimatization
125-250mg twice daily
Tingling, increased urination
Preventatively, from 3,000m
Dexamethasone
Severe altitude sickness
4-8mg every 6 hours
Various if extended use
Emergency HACE/HAPE only
Ibuprofen
Pain, headache
400-600mg as needed
Stomach upset
Altitude headaches, soreness
Ondansetron (Zofran)
Nausea
4-8mg as needed
Headache, constipation
Altitude nausea
Azithromycin
Bacterial infection
500mg day 1, 250mg days 2-5
Stomach upset
Respiratory infection
Ciprofloxacin
Bacterial infection
500mg twice daily
Sun sensitivity
Traveler's diarrhea
Throat lozenges
Sore throat from dry air
As needed
None
Throughout expedition
Electrolyte supplements
Hydration, energy
Daily
None if proper dosing
Daily at altitude
Emergency Protocols and Rescue
Knowing emergency procedures previous to launching on the journey gives one peace of mind and can be the difference between life and death. While there are heli-rescue services available in Nepal, they are weather and altitude-dependent and require guaranteed payment. Rescue insurance with high altitude evacuation coverage is a must.
Your expedition party should have procedures in place in the event of different types of emergencies. Each member should know how to recognize the signs of serious altitude sickness, handle injuries, and make a call for assistance. Satellite phones can be a lifeline in areas that do not have cell service.
Emergency Type
Recognition Signs
Immediate Action
Communication Protocol
Evacuation Criteria
Severe AMS/HACE
Confusion, loss of coordination, severe headache
Descend immediately, oxygen, dexamethasone
Radio to base, contact helicopter
Cannot descend on own power
HAPE
Breathlessness at rest, cough, chest tightness
Descend immediately, oxygen
Radio to base, contact helicopter
Oxygen saturation below 70%
Fracture/serious injury
Obvious injury, inability to walk
Stabilize, pain management
Satellite phone to rescue
Cannot walk safely
Severe frostbite
White/hard tissue, no sensation
Warm gradually, do NOT rub
Radio to guide base
Deep tissue damage
Avalanche burial
Team member missing
Beacon search, probe, dig
Emergency beacon, radio
Any burial
Lost/separated
Team member not visible
Stop, call out, wait
Radio team, stay put
Nightfall approaching
Cost Analysis for Three-Peak Expedition
The three-peak challenge involves a considerable financial investment. It’s important to understand the financial implications to budget accordingly. The cost may vary depending on the company organizing the expedition, the season, the number of people, and the services being sought. Below is the general cost of the three peak combined:
Expense Category
Item Description
Low Budget
Mid Budget
High Budget
When to Pay
Expedition package
Guide service, permits, food on trek
$5,000
$6,500
$8,500
60-90 days before
International flights
Round-trip to Kathmandu
$800
$1,200
$1,800
90-180 days before
Domestic flights
Kathmandu-Lukla return
$350
$370
$400
Included or separate
Hotels in Kathmandu
5-6 nights total
$125
$300
$600
During trip
Meals in Kathmandu
Restaurant meals
$100
$200
$400
During trip
Travel insurance
Emergency evacuation coverage
$200
$300
$500
Before departure
Personal gear purchase
Boots, clothing, equipment
$1,000
$1,500
$3,000
1-6 months before
Gear rental in Nepal
Technical equipment
$200
$300
$500
During trip
Guide tips
Lead and assistant guides
$300
$500
$800
End of trip
Porter tips
Support staff
$100
$150
$250
End of trip
Extra snacks/drinks
Personal treats
$50
$100
$200
Before/during trip
Souvenirs/gifts
Shopping
$50
$150
$400
During trip
Nepal visa
Entry permit
$50
$50
$50
On arrival
Vaccinations
Recommended shots
$150
$250
$400
2-6 months before
Medical consultation
Pre-trip checkups
$300
$500
$800
3-6 months before
Medications
Altitude and general meds
$100
$150
$250
1-2 months before
Emergency fund
Unexpected expenses
$500
$1,000
$2,000
Available reserve
TOTAL COST
Complete expedition
$9,375
$13,570
$20,850
Various
Three Peak Climbing Package with MRT Cost
Group Size
Price Per Person
Deposit Per Person
Minimum People Required
Status
1 Pax
$5,500.00
$1,650.00
1
Available, Book Now
2–4 Pax
$5,150.00
$1,545.00
2
Available, Book Now
5–10 Pax
$4,800.00
$1,440.00
5
Available, Book Now
Money-Saving Strategies
There are some ways that the overall cost can be reduced without compromising on safety or the experience.
The early you book, the more discount you can acquire. Traveling during the "shoulder season," in late March or early November, could also lower prices.
Sharing the gears will save on duplication. But don't scrimp on the most important of safety gear: good boots, insurance or guides.
The "savings" above could cause the expedition to fail or, in extreme scenarios, result in death. They're not meant to save in the most perilous ways, but to save well.
Final Preparation Checklist for Three Peak Climbing in Nepal
Three Months Before Departure
The last three months leading up to the expedition are the time to concentrate on preparation. You need to solidify all the logistical arrangements, complete all purchases of gear, and make sure that your training is peaking at the correct time.
Task
Deadline
Priority
Notes
Confirm expedition booking
90 days before
Critical
Get written confirmation
Purchase international flights
90 days before
Critical
Book early for best prices
Order any specialty gear
90 days before
High
Allow time for shipping
Schedule medical appointments
75-90 days before
Critical
Get prescriptions filled
Apply for Nepal visa (if pre-applying)
60-90 days before
Moderate
Can also get on arrival
Purchase travel insurance
60 days before
Critical
Must cover helicopter rescue
Break in new boots
60-90 days before
Critical
Prevent blisters on expedition
Test all gear on training hikes
45-60 days before
High
Find problems early
Get all vaccinations
30-60 days before
High
Some require multiple doses
Fill prescriptions
30 days before
High
Include extra in case of delays
Create detailed packing lists
30 days before
Moderate
Reduces forgetting items
Inform bank/credit cards of travel
14-30 days before
Moderate
Prevent card blocks
Make photocopies of documents
14 days before
Moderate
Passport, insurance, permits
Pack gear bags
7 days before
High
Weigh to check airline limits
Final training session
7-10 days before
Low
Light workout, then rest
One Week Before Departure
The final week should be about resting, final preparations, and psychological preparation. It is best not to have intense physical training, since your body needs time to rest before embarking on the expedition.
Take time to visualize success. Picture yourself standing on top of each mountain. Picture yourself dealing with challenges in a calm, rational manner. Visualizing success helps to build confidence and calm pre-hike jitters. It’s also important to mentally prepare yourself for the chance that you may not reach the top of all three mountains.
Dipak starts to step up from porter, guide, and trekking leader to the company owner. Sometimes he share his experience with others as well as wrote in local travel news. Most of time he spend his time on mountain and his company.